It has always been difficult and time-consuming to set up the proper development environment, particularly when working with a diverse team of developers (frontend, backend, software engineer, etc.). After seeing numerous developers struggle to get things up and running, I’ve made the decision to take on this job head-on.

A compatibility layer called Windows Subsystem for Linux (WSL) enables users to operate a Linux distribution (distro) natively on Windows 11 without the necessity of a virtual machine. Microsoft has greatly enhanced WSL2’s compatibility and performance, making it a great option for developers who would rather use Linux tools in a Windows environment. In addition to being preferred, it also facilitates development (all cloud infrastructure is primarily Linux-based).
Installing WSL2, configuring Python, setting up virtual environments, and integrating all of this with Visual Studio Code (VS Code) will all be covered in this post.
We’ll also go over some standard troubleshooting techniques to assist you in fixing any problems you may run into.
Step 1: Installing WSL2 on Windows 11
1.1 Enable WSL
Before installing WSL2, you need to enable the Windows Subsystem for Linux feature:

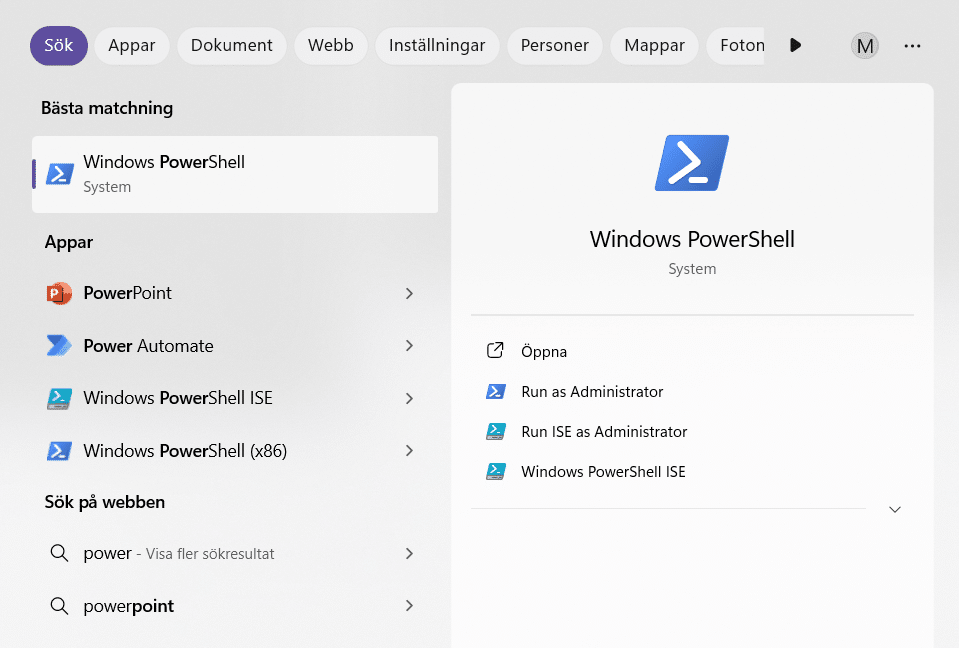
- Open PowerShell as an Administrator. You can do this by right-clicking the Start button and selecting “PowerShell (Admin).”
- Run the following command to enable WSL:
wsl --installThis command installs the necessary components for WSL and sets WSL2 as the default version.
1.2 Restart Your Computer
After the installation is complete, you will be prompted to restart your computer. Do so to ensure that all changes take effect.
1.3 Select Linux Distribution
Ubuntu is the default Linux Distribution so in my case I just follow the prompts to create a user and password.
1.4 Verify WSL Version
To ensure that WSL2 is correctly installed, you can check the version of your distribution by running:
wsl --list --verboseYou should see something like this:

If your distribution is set to version 2, you are ready to proceed. If not, you can convert it using:
wsl --set-version <NAME> <VERSION>Replace <NAME>
wsl --set-version Ubuntu 21.4 Troubleshooting WSL installation
Many error may happen while installing WSL.
1.4.1 The windows features have not been activated:
for some reasons, some features may not have been correctly activated so:
- Search for “turn windows features on or off”
- Verify that Hyper-V, Virtual Machine Platform and Windows Subsystem for Linux are checked.
- Restart your computer
Step 2: Installing Python on WSL2
With WSL2 set up, you can now install Python. The recommended way to install Python on WSL2 is through the package manager of your Linux distribution.
2.1 Update Package Lists
First, update the package lists to ensure you get the latest version of Python:
sudo apt update2.2 Install Python
Next, install Python with the following command:
sudo apt install python3 python3-pipThis command installs both Python 3 and pip, the package manager for Python.
2.3 Verify Installation
After installation, verify that Python and pip are correctly installed:
python3 --version
pip3 --version
Both commands should return the installed versions of Python and pip.
If you want to write only python in place of python3 and pip instead of pip3 make aliases:
alias python=python3
alias pip=pip3
Step 3: Setting Up a Virtual Environment
A virtual environment allows you to create isolated Python environments for different projects, ensuring that dependencies do not conflict.
3.1 Install Virtualenv
To create a virtual environment, you need to install the virtualenv package:
sudo apt install python3-virtualenv3.2 Create a Virtual Environment
Navigate to your project directory and create a virtual environment:
mkdir my_project
cd my_project
virtualenv .venv
Here, my_project is the name of your project folder, and .venv is the name of the virtual environment folder.
3.3 Activate the Virtual Environment
To activate the virtual environment, run:
source .venv/bin/activateYou should see (.venv) appear at the beginning of your terminal prompt, indicating that the virtual environment is active.
(.venv) username@computername:~/my_project$3.4 Deactivate the Virtual Environment
To deactivate the virtual environment, simply run:
deactivateStep 4: Integrating with Visual Studio Code
4.1 Install VS Code
Obviously, if you haven’t installed Visual Studio Code yet, download and install it from the official website.
4.2 Install the WSL Extension
To work with WSL2 in VS Code, you need to install the WSL extension:
- Open VS Code.
- Go to the Extensions view by clicking the Extensions icon in the Activity Bar on the side of the window or by pressing
Ctrl+Shift+X. - Search for “WSL” and click “Install.”
Here is the full tutorial with even more explanation.
4.3 Activate WSL and open your project folder
Once the WSL extension is installed, you can activate WSL with either:
- Open the Command Palette (
Ctrl+Shift+P) in VS Code and Type “WSL: Connect to WSL” - or or click on down-left icon “><” and click on Connect to WSL. .
- You can now select your project folder in the Linux file system (e.g.,
/home/your-username/my_project).
VS Code will reopen with your project folder in the WSL environment.
4.4 Configure Python in VS Code
Make sure Python is downloaded and activated in the subsystem by clicking on Extensions and select Install in WSL: Ubuntu
To ensure that VS Code uses the correct Python interpreter (i.e., the one in your virtual environment):
- Open the Command Palette (
Ctrl+Shift+P). - Type “Python: Select Interpreter” and choose the interpreter located in your virtual environment (e.g.,
/home/your-username/my_project/.venv/bin/python3).
Last words
By following this guide, you should now have WSL2, Python, and virtual environments set up on your Windows 11 machine, integrated with Visual Studio Code.
This setup allows you to take advantage of the best of both worlds: the power of Linux development tools within the comfort of the Windows environment. With the troubleshooting tips provided, you should be able to resolve common issues and keep your development environment running smoothly.
Of course, some version of Windows 11 may bring other type of troubles and this guide may not cover them all, but it’s a start.


Leave a Reply